|
|
|
|
|
| Donate | App | Join | Log in |
|
|
|
|
|
| Donate | App | Join | Log in |

- AI Artificial intelligence
- App
- Artificial intelligence AI Video generators
- Computer - Cell phone
- Electronic Brand
- Electronic Flea Market
- GPS - GPRS
- HAM Radio
- I.C. & functions
- Instruments
- Instruments - Funcions
- Internet
- LAN
- Optics
- Phones
- Photography
- Software
- Solar panels
- Tablet
- Tracking
- Video - TV
- Weather Stations
- Web - Best sites
 | "Descrizione" by admin (19549 pt) | 2025-Jan-23 12:14 |
Review Consensus: 10 Rating: 10 Number of users: 1
| Evaluation | N. Experts | Evaluation | N. Experts |
|---|---|---|---|
| 1 | 6 | ||
| 2 | 7 | ||
| 3 | 8 | ||
| 4 | 9 | ||
| 5 | 10 |
SDRangel is an open-source platform for managing Software-Defined Radio (SDR). It enables the transmission, reception, and analysis of radio signals using SDR devices such as RTL-SDR, HackRF, LimeSDR, and others.

Key Features:
- Multi-mode support: Handles a wide range of radio modes, including FM, AM, SSB, DMR, P25, ADS-B, AIS, and more.
- Advanced graphical interface: Provides visual tools for configuring, decoding, and analyzing signals in real-time.
- Cross-platform compatibility: Works on operating systems like Windows, Linux, and macOS.
- Extensibility: Built on a modular architecture, allowing plugins to add new features and modes.
Main Applications:
- Amateur radio
- Communication monitoring
- Research and development of RF applications
- Decoding digital signals such as DMR, AIS, ADS-B, RTTY, Morse etc.
Download SDRangel x Windows: Releases · f4exb/sdrangel
Support: Issues · f4exb/sdrangel · GitHub
Forum: SDRangel - Index page

Run the downloaded.exe
Two windows are opened:
 |  |
For the time being, close Configuration and leave SDRangel open.
Let us see what are the input devices through which SDRangel is able to decode the signals and we set up the RTL-SDR key.
Click in the upper left corner on the Add Rx device icon

and then on the popup arrow

______________________
Now I list some problems that may occur at this point of the installation and their solutions.
- Problem. The RTL-SDR dongle does not appear in the list above, that is, you do not see RTL-SDR....
- Solution: check if it is present in the "Safe Hardware Removal" icon at the bottom right of the monitor

If it appears there, it means that it has already been installed. SDRangel does not see it because it is already installed.
If the dongle RTL-SDR does not appear:
- or the dongle is not inserted into the USB socket
- or the dongle has not been installed with the Zadig program.
So it is essential to use the program Zadig
Download Zadig
Zadig - USB driver installation made easy

Zadig is a Windows application that installs generic USB drivers such as WinUSB, libusb-win32/libusb-1.0.dll, or libusbK, which are necessary for a wide range of USB devices to communicate with Windows. It is especially useful for RTL-SDR because standard drivers do not support this device. Download Zadig from the official website and launch the application.
Connect the RTL-SDR Device Before running Zadig, connect your RTL-SDR dongle to a USB port on your computer. This ensures that the device is ready and detected by Zadig.
Open Zadig and Select the RTL-SDR Device Once launched by clicking on Zadig.exe, Zadig should automatically detect the RTL-SDR dongle. Open the dropdown menu within the Zadig interface and select the device listed as "Bulk-In, Interface (Interface 0)" or a similar name. If the device does not appear in the list:
- Check your connections and make sure the dongle is properly inserted. If the device does not appear in the dropdown menu, proceed with the installation as long as "Install WCID Driver" is an option.
- If multiple dongles are present, repeat the process for each dongle.
Install the WinUSB Drivers With the device selected, proceed to install the WinUSB drivers by clicking on "Install Driver". This action will replace any existing drivers the dongle might be using with ones compatible with RTL-SDR operations. This step is crucial as it ensures that rtl1090 or any other SDR software can effectively communicate with the dongle.
If no device shows up on the screen, as mentioned above, select Options and then List all devices, choose the type of dongle, and click on Install WCID Driver.
Click Options>List All Devices

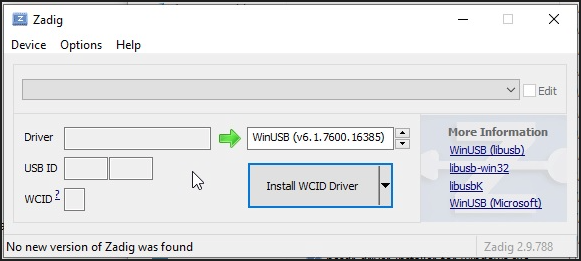
From the dropdown list, several devices might appear: any of them are generally fine, but ensure that "Bulk-In, Interface (Interface 0)" or "RTL2832UHIDIR" or "RTL2832U" or "Blog V4" is selected in the USB ID box, and that the selected dongle's USB ID is "0BDA 2838 00".
Make sure that "WinUSB" is displayed in the box indicated by the green arrow, while the box on the left is not important. Click on "Replace/Install Driver" This operation may take a few minutes, and during this time, you will see "Installing Driver" When "The driver was installed successfully" appears, click "Close" and close the Zadig window.

This procedure must be repeated if you add a new dongle or change the dongle.
The first operating screen, so the one that allows you to adjust frequency and signals should be this one, in the left part the Receiver and in the right part the Spectrum display.

- Problem. The Spectrum display does not appear or if you have closed it with the upper right button.
- Solution: You can make it reappear with the lower left button in the receiver window

At this point, you just need to click on one of the two blue triangles in the top left-hand corner to make it work. Why are there two? Because if there are several receivers, each can be switched on separately with its own button or they can all be switched on at the same time with the topmost button.

(Attention: It is possible to receive different and separate frequencies on different receivers, but each receiver must have its own RTL-SDR dongle so for example, 2 frequencies, 2 RTL-SDR.).
- Problem. This error message may appear: Could not start sample source

- Solution: Close the receiver window by clicking on the X in the top right-hand corner and reopen the window, checking that the "Sample rate" is higher than 2,000,000. In the image below it is 1,024,000. Increase it to 2,024,000

- Problem: The Receiver plugin (the one you see above) does not appear.
- Solution: In the menu on the top left, click on the 4° icon>Select sampling device>RTL-SDR(0)

_________________
We continue with the installation
Check the AGC box and increase the Gain a little. I also recommend clicking the DC button to avoid any interference from the dongle. It should be remembered that, in some cases, AGC is contraindicated and this depends on the type of receiver, any disturbances, volume adjustment.
AGC (Automatic Gain Control) is a feature used in electronic devices to automatically adjust the input signal level. It is widely employed in communication systems, radios, audio equipment, and SDR systems to optimize signal quality.
What it's for:
- Automatic adjustment: Keeps the signal level consistent by compensating for variations in intensity (e.g., signals that are too weak or too strong).
- Quality improvement: Reduces distortion and saturation, enhancing signal clarity and processing.
- Versatile applications: Used in radio receivers, microphones, recorders, and SDR systems.
Important. In order to be able to listen to and decode the signals of the selected frequency, a "Demodulator" must be activated. If you want to listen to and decode RTTY, you must load the RTTY demodulator, for ADS-B the ADS-B demodulator, and so on. Remember, however, that every time you click on Apply, a demodulator appears.
Demodulators are activated in the receiver module by clicking on the triangle icon

Choose the appropriate demodulator from the drop-down menu and then click on Apply. The demodulators, at the moment (January 2025) are well 40 to which we add the Features that we will see later. They are all listed in the drop-down menu that opens with a click on the triangle icon at the top left of the Receiver, but for convenience I report them aggregated.
 |  |
 |  |
Other decodings can be found in: Features
Click in the upper left corner on the Add Features icon, which has the wrench symbol with the + sign

An Analyze features popup menu appears showing, with a click on the down arrow, all the options:

AFC
Automatic Frequency Gain is the automatic frequency gain of the receiver that allows stable frequency control.
AMBE Controller
An USB dongle for converting analog audio directly to AMBE data without the intervention of other hardware. It is a product of the Swiss manufacturer DVMEGA (https://www.dvmega.nl/dvstick30/).
AMBE (Advanced Multi-Band Excitation) is a voice coding technology developed to provide high audio quality at low data rates. Mainly used in applications such as digital radio, satellite communications and VoIP systems, AMBE utilises advanced algorithms to analyse and compress voice while maintaining intelligibility and clarity.
The AMBE Controller is particularly useful for voice modes such as DMR (Digital Mobile Radio) and P25 (Project 25), as well as other digital communication protocols like NXDN, D-STAR, and TETRA.
These modes utilize AMBE encoding or its variants (such as AMBE+2) to compress voice into a highly efficient data stream. The main benefits include:
Bandwidth Efficiency: Allows voice transmission using reduced bandwidth, which is essential in environments with limited radio resources.
High Voice Quality: Maintains good intelligibility and clarity even under challenging network conditions or in the presence of errors.
Interoperability: Thanks to standardization, AMBE is compatible across devices and systems that adopt these protocols.
AIS
AIS (Automatic Identification System) is a communication and monitoring system that enables ships to automatically and continuously transmit and receive information on their position, course, speed and other relevant data. This information is shared via maritime VHF radio (typically on the dedicated frequencies 161.975 MHz and 162.025 MHz).
APRS
APRS is a packet-based radio communication system developed in the late 1980s by Bob Bruninga (WB4APR). It combines data telemetry, position reporting, and messaging features into a single protocol, commonly used by the amateur radio community for:
- Position Tracking: Real-time broadcast of latitude, longitude, altitude, and movement speed/direction.
- Weather and Telemetry: Distribution of meteorological data from fixed or portable weather stations (temperature, pressure, humidity, wind speed/direction).
- Messaging: Text messages between stations, similar to SMS over radio packets.
- Network Building: Linking stations via digipeaters (digital repeaters) and Internet gateways (IGates) for wider coverage.
Operates in the VHF or UHF amateur bands (most commonly 144.390 MHz in North America), using narrowband FM modulation.
Antenna Tools
How to design antennas on certain frequencies
OK, I will not dwell on the other options because it would be too long and the purpose of this review is to explain as quick an approach as possible to this programme, which is extremely complex and comprehensive.
| Evaluate |