dump1090 is open source software designed to decode Mode S-Mode Automatic Dependent Surveillance-Broadcast (ADS-B) signals transmitted by aircraft.
The RTL-SDR V3 is an SDR device based on the RTL2832U and R820T2/R860 chips, designed to receive and decode radio signals across a wide range of frequencies. Initially developed as a DVB-T (digital TV) receiver, it was adapted to function as an SDR, making it a flexible tool for listening to and analyzing radio signals.


The signals, emitted at 1090 MHz, contain information such as location, altitude, speed and flight identifier, allowing users to monitor air traffic in real time and (with the VirtualRadar map) decode:
- Altitude
- Vertical Speed
- Speed
- Heading
- Distance
- Squawk
- Engines
- Route
- Silhouette
- Flag
- Registration
- ICAO
- Callsign
- Route

The RTL-SDR stick, however, needs the Zadig program to work, which will install the operating driver on the computer.
Zadig - USB driver installation made easy

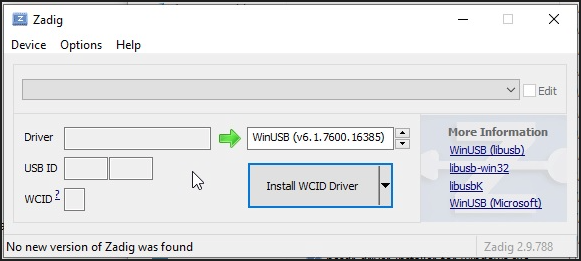
Zadig is a Windows application that installs generic USB drivers such as WinUSB, libusb-win32/libusb-1.0.dll, or libusbK, which are necessary for a wide range of USB devices to communicate with Windows. It is especially useful for RTL-SDR because standard drivers do not support this device. Download Zadig from the official website and launch the application.
Connect the RTL-SDR Device Before running Zadig, connect your RTL-SDR dongle to a USB port on your computer. This ensures that the device is ready and detected by Zadig.
Open Zadig and Select the RTL-SDR Device Once launched by clicking on Zadig.exe, Zadig should automatically detect the RTL-SDR dongle. Open the dropdown menu within the Zadig interface and select the device listed as "Bulk-In, Interface (Interface 0)" or a similar name. If the device does not appear in the list:
- Check your connections and make sure the dongle is properly inserted. If the device does not appear in the dropdown menu, proceed with the installation as long as "Install WCID Driver" is an option.
- If multiple dongles are present, repeat the process for each dongle.
Install the WinUSB Drivers With the device selected, proceed to install the WinUSB drivers by clicking on "Install Driver". This action will replace any existing drivers the dongle might be using with ones compatible with RTL-SDR operations. This step is crucial as it ensures that rtl1090 or any other SDR software can effectively communicate with the dongle.
If no device shows up on the screen, as mentioned above, select Options and then List all devices, choose the type of dongle, and click on Install WCID Driver.
Click Options>List All Devices

From the dropdown list, several devices might appear: any of them are generally fine, but ensure that "Bulk-In, Interface (Interface 0)" or "RTL2832UHIDIR" or "RTL2832U" or "Blog V4" is selected in the USB ID box, and that the selected dongle's USB ID is "0BDA 2838 00".
Make sure that "WinUSB" is displayed in the box indicated by the green arrow, while the box on the left is not important. Click on "Replace/Install Driver" This operation may take a few minutes, and during this time, you will see "Installing Driver" When "The driver was installed successfully" appears, click "Close" and close the Zadig window.

This procedure must be repeated if you add a new dongle or change the dongle.
________________
Now, there are two ways to make dump1090 work:
- Create it from its .zip file.
- Modify the rtl1090 program if it is already installed on the computer.
Part I
Creating dump1090 from the dump1090-master.zip File
dump1090 consists of a. zip file of 1.19 MB that you can download here:
https://github.com/MalcolmRobb/dump1090/archive/master.zip

unzipped:

If you have Windows you will need only this zipped file:

then extract it into a folder.

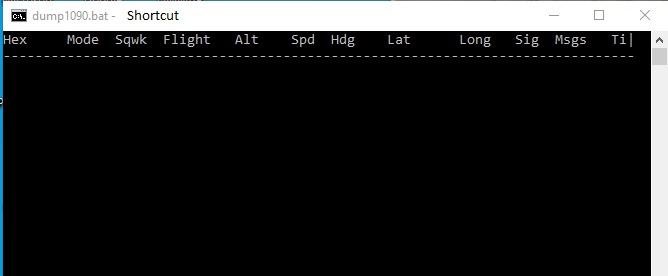
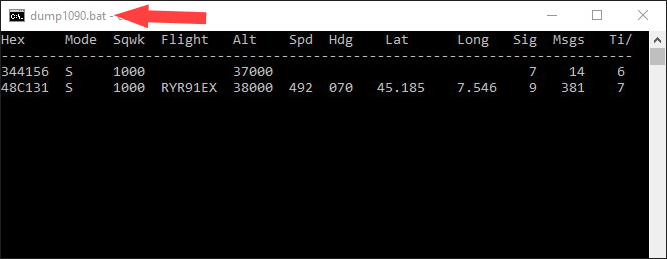
Start the program with dump1090.bat
Main Features of Dump1090:
Efficient Decoding:
Dump1090 is renowned for its ability to decode even weak signals, offering broader coverage compared to other decoders.
RTL-SDR Support:
The software is compatible with RTL-SDR devices, making ADS-B signal reception accessible at a low cost.
Integrated Web Interface:
It includes an HTTP server that displays detected aircraft on a map, facilitating real-time monitoring.
Multi-Platform Support:
Originally developed for Linux, Dump1090 is also available for Windows and macOS.
Versions and Variants:
There are several variants of Dump1090, each with specific functionalities:
Dump1090-fa:
Maintained by FlightAware, this version is integrated with their receivers and optimized for use with their services.
Dump1090-mutability:
A fork that introduces enhancements such as 2.4 MHz decoding and other optimizations.
Installation on Different Platforms:
Linux (e.g., Raspberry Pi):
Dump1090 can be installed following distribution-specific instructions. For example, to install dump1090-mutability on Ubuntu 22.04, you can use the command:
sudo apt-get install dump1090-mutability.
Windows:
While there is no official support for Windows, unofficial versions of Dump1090 are available.
A detailed guide on Windows installation can be found on Fly Italy ADS-B:
https://flyitalyadsb.com/dump1090-su-windows/
Configuration and Use:
After installation, it's essential to properly configure Dump1090 to optimize signal reception. Parameters like receiver gain can significantly affect performance.
Integration with Other Software:
To enhance the monitoring experience, Dump1090 can be integrated with other software offering advanced graphical interfaces:


Part II
Modify the rtl1090 program if it is already installed on the computer.
dump1090 can be installed directly in the rtl1090 directory if this program is present and installed on your computer.
If rtl1090 is already present and installed on your computer, you can install dump1090 directly into its directory.
This method is simpler as you likely already have most of the necessary files on your PC, with just one exception. I strongly recommend making a copy of the directory to avoid corrupting existing data.
- Copy the RTL1090 Directory: It's advisable to make a complete copy of your existing RTL1090 directory. I suggest copying it to
C:\Tools\dump1090-Win\. - Download Essential Files: At a minimum, you need to download two files -
dump1090.exe and dump1090.bat. These essential files for the operation of the program are contained in the dump1090 program zip, which can be downloaded from this site: http://www.satsignal.eu/software/dump1090-win.1.10.3010.14.zip
the directory of “dump1090-win.1.10.3010.14. zip” is as follows:

- Add Files to the New Directory: Move the two files,
dump1090.exe and dump1090.bat, to the directory C:\Tools\dump1090-Win\. If you are updating an existing RTL1090 directory, which is not recommended, ensure you do not overwrite any .dll files with those from the Zip file.

- Configure the .bat: The content of the dump1090.bat file should be configured as follows:
dump1090.exe --interactive --net --net-beast --mlat --gain -10
- Run the .bat: Double-click on the dump1090.bat file to start the program. Initially, you will see a copyright message, followed by a list of detected aircraft.
Warning: check the radio listening legislation in your country.