Detailed and updated guide to using PlanePlotter with rtl1090 by Jetvision:
As a receiver just use an RTL-SDR USB dongle like RTL2832U and R820T2 version 3.
To read the complete installation and choose from the 3 versions of Jetvision's rtl1090 you can go to this review also on the Tiiips site. Then you can return to this page and follow the procedure for connecting to PlanePlotter.
1. Installation and Configuration of rtl1090:
- Download and Install rtl1090:
- Visit the official rtl1090 website and download the latest version of the software.
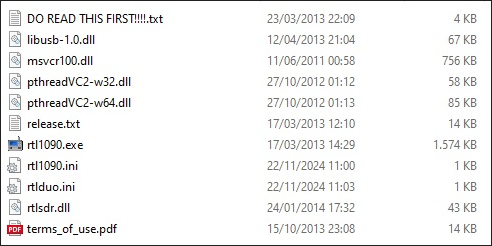
I will first explain the installation of Version 1. The Version 2 follows the same installation procedure. In both versions, it is necessary to check that the following programs are present in the directory (with the added files:):
Version 1 Version 2
- Extract the ZIP package files into a dedicated folder on your computer.
- Install Necessary Drivers:
- Download and launch Zadig, a tool to install the necessary USB drivers for the RTL-SDR dongle.
Zadig - USB driver installation made easy

- Connect your RTL-SDR device to a USB port.
- Open Zadig, click Option>List All Devices and select the RTL-SDR device from the dropdown list (it may appear as "Bulk-In Interface") and if there is no device, follow the next step
- Install the WinUSB drivers by clicking "Install Driver". This step is crucial for rtl1090 to communicate with the device.

Download this file
http://sdr.osmocom.org/trac/raw-attachment/wiki/rtl-sdr/RelWithDebInfo.zip
unzip and copy the following files to rtl1090 from this directory: rtl-sdr-release\x32
rtlsdr.dll
msvcr100.dll
libusb-1.0.dll
to your application folder
- Start rtl1090 and verify reception:
- Launch the rtl1090.exe file from the folder where you extracted the software.
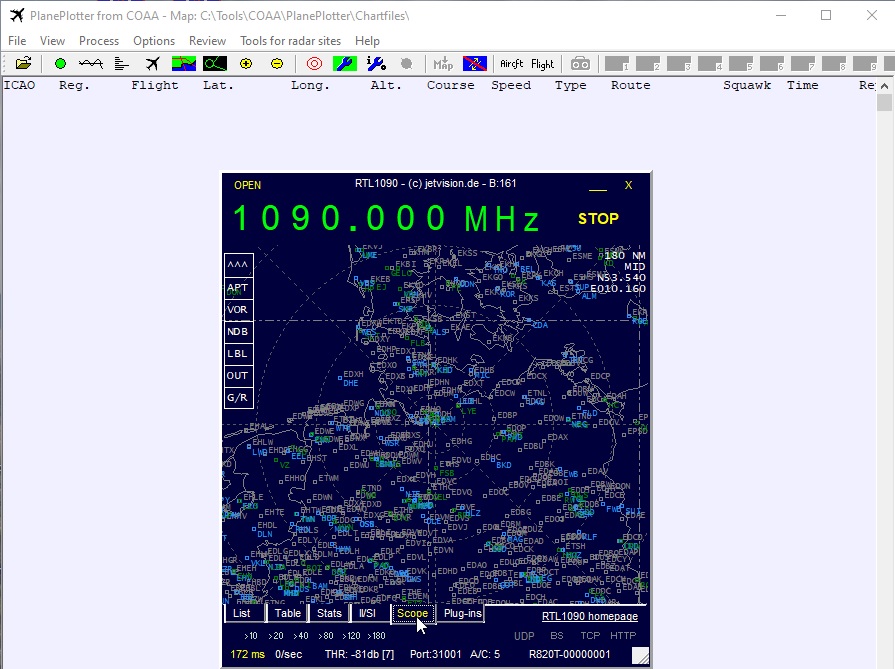
This window appears:

- Press the Start button to begin decoding Mode-S and ADS-B signals.

Click on AGC tuner to improve reception
- If data is being correctly received, you will see a list of messages and aircraft identifiers in the rtl1090 window.
2. Installation and Configuration of PlanePlotter:
- Download and Install PlanePlotter:
- Visit the official COAA website and download the latest version of PlanePlotter.
- Follow the on-screen instructions to install the software.
- Set Initial Location:
- Open PlanePlotter.
- Go to Options > Home location > Home location setup.
- Enter your latitude and longitude (easily found using Google Maps) to accurately set your location.
3. Configuring PlanePlotter for rtl1090:
- Connect rtl1090 to PlanePlotter:
- Ensure that rtl1090 is running.
- Open PlanePlotter and go to Options > I/O settings.
- If the I/O settings option is not clickable, close PlanePlotter, restart the computer, run rtl1090, and after that run PlanePlotter
- Configure the following parameters:
- Input: Select Mode-S/ADS-B.
- RTLdongle> rtl1090 or if it does not work:
- RTLdongle>PC+Dump1090

In Options:

rtl1090 transmits on port 30001

- Start Data Reception:
- Return to the main menu of PlanePlotter.
- Click on Process > Start.
- If everything is configured correctly, aircraft will start appearing on the map.
4. Customizing the PlanePlotter Interface:
- Maps and Display:
- Go to Options > Chart to load custom maps or enable specific visualizations.
- Activate overlays, routes, and flight levels for a more detailed representation.
- Data Sharing:
- Check the legislation of the country where you want to receive and share data. In Germany and the UK, reception is not allowed.
- You can also enable the data sharing feature in Options > Network > Share data.
- Connect to the PlanePlotter network to receive and contribute data from other users, improving coverage.
- Multilateration (MLAT):
- Synchronize your computer's clock with an NTP server (e.g., pool.ntp.org).
- Enable MLAT to calculate the positions of aircraft that do not transmit ADS-B, based on data shared by other users.
5. Troubleshooting Common Issues:
- Issue: PlanePlotter is not Receiving Data.
- Check that rtl1090 is running and receiving messages.
- Ensure that port 31001 is not blocked by the firewall. Add an exception for this port.
- Issue: RTL-SDR Device Not Detected.
- Check the drivers with Zadig and reinstall them if necessary.
- Try changing the USB port or use a higher quality USB cable.
- Issue: Windows Defender Blocks Installation.
- Add an exception in Windows Security for PlanePlotter or rtl1090 files.
- Refer to the guide to create an exclusion in antivirus settings.
Conclusion: Setting up PlanePlotter and rtl1090 is a somewhat complicated process. By following this guide, you can monitor air traffic in real-time and customize the display according to your needs. The combined use of these tools is an excellent solution for monitoring ADS-B and Mode-S.
![]() Planeplotter + rtl1090
Planeplotter + rtl1090 


