
- AI Artificial intelligence
- App
- Artificial intelligence AI Video generators
- Computer - Cell phone
- Electronic Brand
- Electronic Flea Market
- GPS - GPRS
- HAM Radio
- I.C. & functions
- Instruments
- Instruments - Funcions
- Internet
- LAN
- Optics
- Phones
- Photography
- Software
- Solar panels
- Tablet
- Tracking
- Video - TV
- Weather Stations
- Web - Best sites


![]() XHSI with RTL-SDR and rtl1090
XHSI with RTL-SDR and rtl1090
Rating : 8
| Evaluation | N. Experts | Evaluation | N. Experts |
|---|---|---|---|
| 1 | 6 | ||
| 2 | 7 | ||
| 3 | 8 | ||
| 4 | 9 | ||
| 5 | 10 |
10 pts from Al222
| Sign up to vote this object, vote his reviews and to contribute to Tiiips.Evaluate | Where is this found? |
| "Descrizione" about XHSI with RTL-SDR and rtl1090 Review Consensus 10 by Al222 (20710 pt) | 2025-Jan-11 16:00 |
| Read the full Tiiip | (Send your comment) |
XHSI (eXternal High-resolution Simulator Instruments) is an add-on for the X-Plane flight simulator that provides high-fidelity, external glass cockpit displays, enhancing the simulation experience by offering more readable and realistic instruments.

XHSI can also operate without being connected to X-Plane, both in Windows and Linux, using an RTL-SDR V3 dongle, an SDR device based on the RTL2832U and R820T2/R860 chips, designed to receive and decode radio signals across a wide range of frequencies, rtl1090, a free software developed by Jetvision, is used to convert signals received from an RTL-SDR (Software-Defined Radio) R820T or RTL2832U dongle into ADS-B (Automatic Dependent Surveillance-Broadcast) data that can be read and transmitted to other tracking software like PlanePlotter, Virtual Radar Server, or other monitoring tools.
Additionally required are: rtl1090XHSI, a program that enables rtl1090 to communicate the ICAO code of the aircraft to XHSI; the Zadig program, which will install the correct driver; and AptNav201310XP1000, a database of airports, VORs, waypoints, and other navigational aids that will appear on the instrument map.
The whole can be connected to Planeplotter and MULTIPSK for decoding signals.
Operating systems: Can run on Windows with Java 1.5 or higher, MacOS and Linux
What You Need:
- RTL-SDR V3 Dongle: Can be purchased for approximately €45.

- Software rtl1090 Version 3 beta3 . Can be downloaded here:


- Software rtl1090XHSI. Can be downloaded here:
http://it9ybg.altervista.org/RADIO/rtl1090XHSI.zip

- Software Zadig. Can be downloaded here:
Zadig - USB driver installation made easy

Optional: If for some reason you lose your navigation data, you can recover it here:
- Software AptNav201310XP1000. Can be dowloaded here:
http://dev.x-plane.com/update/data/AptNav201310XP1000.zip
Let's first explore the features of the XHSI program, and then we will review the installation procedure for all the programs.
Key Features:
Navigation Display (ND): Emulates the Boeing 737-NG's ND, offering better situational awareness, especially during IFR flights. The ND can be resized and positioned independently, even on a second monitor or separate computer.
Primary Flight Display (PFD): Provides essential flight information in a clear format, modeled after real-world aircraft displays.
Engine Indication and Crew Alerting System (EICAS): Monitors engine performance and alerts, similar to those found in commercial aircraft.
Flaps and Gear Indicators: Displays the status of critical flight controls.
Clock/Chronometer: Includes digital and analog clocks with active buttons and an elapsed timer.
System Requirements:
X-Plane Compatibility: Compatible with X-Plane 10 and 11, rtl1090 in Windows and Linux.
Operating Systems: Supports Windows, macOS, and Linux.
Java Runtime Environment: Requires Java 1.5 or later.
Installation Overview:
Download XHSI: Obtain the latest version from the XHSI project page on SourceForge.
Install the Plugin: Place the XHSI plugin into X-Plane's plugin directory to enable data extraction.
Run the Application: Launch the XHSI application to display the instruments.
Documentation:
Detailed installation and usage instructions are available in the README.txt file included in the download package. Additional information can be found on the XHSI Wiki on SourceForge.
Support and Community:
For assistance and discussions, visit the XHSI subforum on X-Plane.org.
Development and Contributions:
XHSI is an open-source project. Developers interested in contributing can access the source code and participate in development through the XHSI project page on SourceForge.
_______________
For the installation of the RTL-SDR dongle, go to the page RTL-SDR V3
___________
At this point, you can either automatically install the rtl1090 program or follow the manual installation procedure.
Automatic Installation and Configuration of rtl1090
For the installation of Jetvision's rtl1090 software, you can use the RTL1090-IMU program, which automatically downloads the necessary files and assists you in the installation process.
Visit the official rtl1090 website (https://rtl1090.com) and download the RTL1090-IMU.zip file.

After downloading the rtl1090imu.zip file, you need to extract it to a folder where you will find the executable file, rtl1090imu.exe.
 |  |
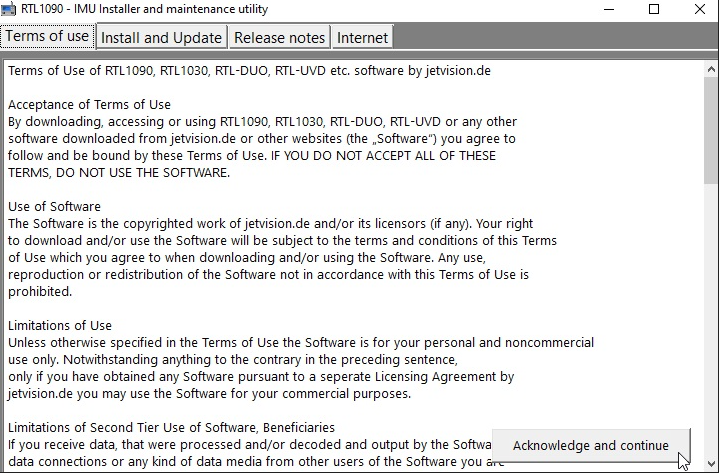
Double-click on rtl1090imu.exe, allow Windows to run the app which is blocked by Windows Defender. Select "Install and Update" and confirm by clicking on "Acknowledge and Continue"
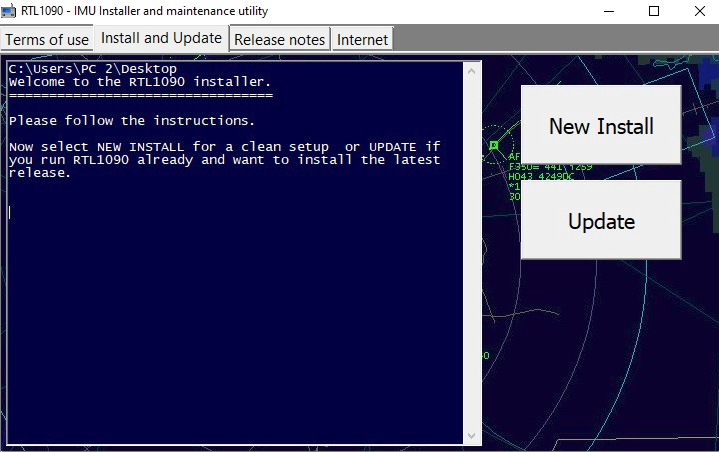
If rtl1090 has never been installed or you want to have a clean installation click on New Install
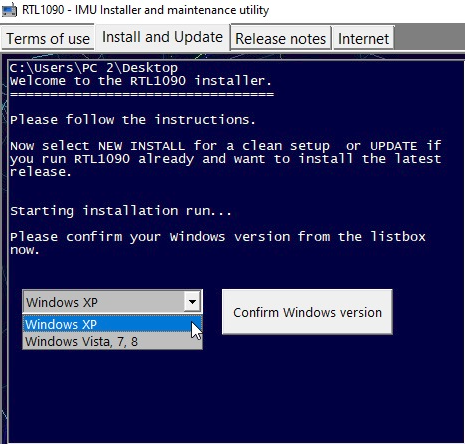
The app is a bit dated and offers the choice between Windows Vista, 7, 8 or Windows XP.
Confirm the folder where you want to install or create a new one, with a right click of the mouse, on the right side.

With a click on OK, the program automatically installs all the drivers and launches Zadig.
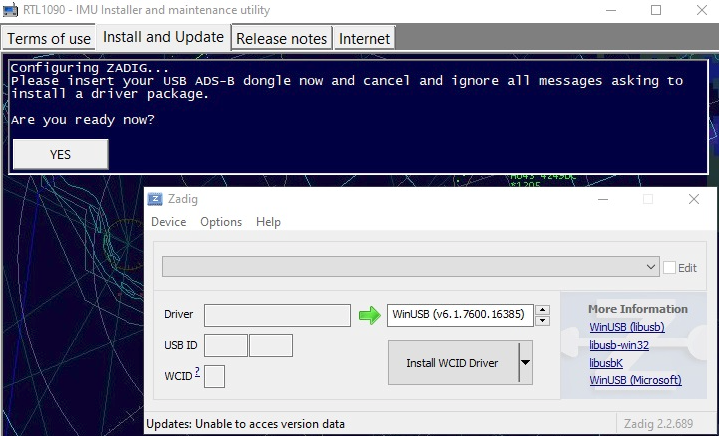
With Zadig open, the app provides the necessary instructions to continue and complete the installation. After opening Options and enabling "List All Devices," you should see "Bulk-in..." or "RTL2838UHIDIR" at the top line in Zadig. At the end of the process, a message will confirm that everything was successful with "The driver was installed successfully."
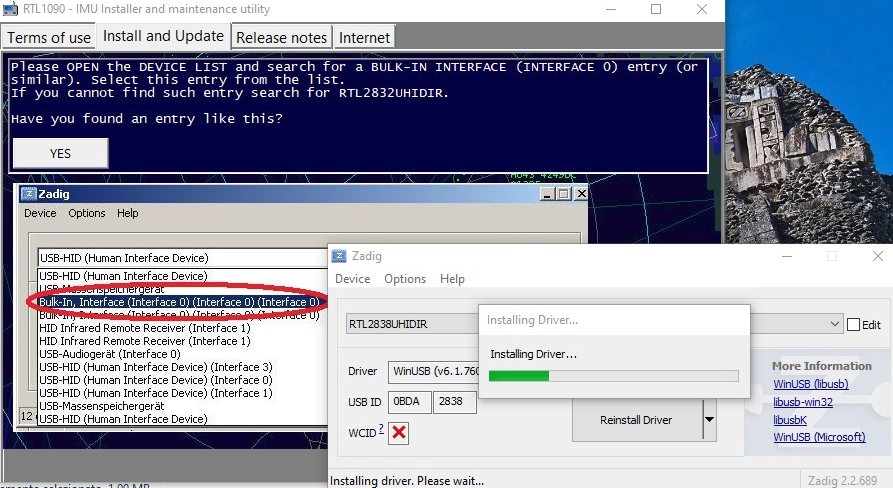
Or you can manually install the drivers with the procedure I explain now.
Manual installation and configuration of rtl1090 Version2
Visit the official rtl1090 website (https://rtl1090.com) and download Version 2 of the software.

rtl1090 Version 2 rtl1090.zip
Version 2 brought significant improvements, introducing greater stability and compatibility with more RTL-SDR devices. It implemented smoother data transmission to external software like PlanePlotter and Virtual Radar Server. Additionally, it includes new options for filtering Mode-S messages, making monitoring more efficient. The interface has been improved while maintaining ease of use.
This is the original downloaded version that needs to be modified by adding some files (the same ones we added in Version 1):

- Download Zadig
Zadig - USB driver installation made easy

Zadig is a Windows application that installs generic USB drivers such as WinUSB, libusb-win32/libusb-1.0.dll, or libusbK, which are necessary for a wide range of USB devices to communicate with Windows. It is especially useful for RTL-SDR because standard drivers do not support this device. Download Zadig from the official website and launch the application.
Connect the RTL-SDR Device Before running Zadig, connect your RTL-SDR dongle to a USB port on your computer. This ensures that the device is ready and detected by Zadig.
Open Zadig and Select the RTL-SDR Device Once launched by clicking on Zadig.exe, Zadig should automatically detect the RTL-SDR dongle. Open the dropdown menu within the Zadig interface and select the device listed as "Bulk-In, Interface (Interface 0)" or a similar name. If the device does not appear in the list:
- Check your connections and make sure the dongle is properly inserted. If the device does not appear in the dropdown menu, proceed with the installation as long as "Install WCID Driver" is an option.
- If multiple dongles are present, repeat the process for each dongle.
Install the WinUSB Drivers With the device selected, proceed to install the WinUSB drivers by clicking on "Install Driver". This action will replace any existing drivers the dongle might be using with ones compatible with RTL-SDR operations. This step is crucial as it ensures that rtl1090 or any other SDR software can effectively communicate with the dongle.
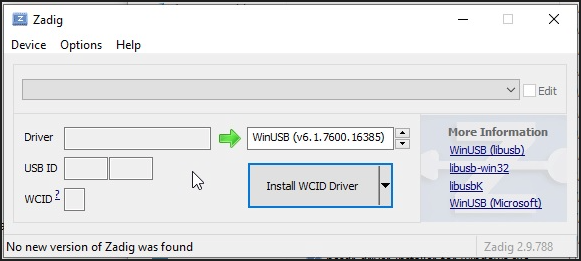
If no device shows up on the screen, as mentioned above, select Options and then List all devices, choose the type of dongle, and click on Install WCID Driver.
Click Options>List All Devices

From the dropdown list, several devices might appear: any of them are generally fine, but ensure that "Bulk-In, Interface (Interface 0)" or "RTL2832UHIDIR" or "RTL2832U" or "Blog V4" is selected in the USB ID box, and that the selected dongle's USB ID is "0BDA 2838 00".
Make sure that "WinUSB" is displayed in the box indicated by the green arrow, while the box on the left is not important. Click on "Replace/Install Driver" This operation may take a few minutes, and during this time, you will see "Installing Driver" When "The driver was installed successfully" appears, click "Close" and close the Zadig window.

This procedure must be repeated if you add a new dongle or change the dongle.
Configuration of RTL1090 Software
To ensure that your RTL1090 software functions correctly, it is essential to install some support files. Here are the steps to configure your system:
Step 1: Download the Necessary Files
First and foremost, download the file from this link:
https://osmocom.org/attachments/download/2242/RelWithDebInfo.zip
Step 2: Unzip and Copy the Necessary Files
Once you have downloaded the RelWithDebInfo.zip file, proceed to unzip and copy the necessary files.
 |  |
Unzip the file ZIP rtl-sdr-release

Open directory x32

Copy the Files
Navigate to the extracted directory, specifically to rtl-sdr-release\x32. Locate the following files:
rtlsdr.dlllibusb-1.0.dll
Copy these files into the RTL1090 installation folder on your computer. The RTL1090 directory should contain these files to ensure proper functionality.

Launch RTL1090 and Verify Reception To test the setup:
- Launch the rtl1090.exe File: Navigate to the folder where you have extracted and updated the RTL1090 software.
- Run rtl1090.exe: Double-click on the file to start the software.

- Launch RTL1090 and Verify ReceptionTo test the setup and begin decoding Mode-S or ADS-B signals:
Start Decoding: Press the Start button to begin decoding either Mode-S or ADS-B signals. Note that you cannot receive both simultaneously with a single dongle; separate dongles are required for each.
Verify Reception: Once the software is running, check that it is correctly receiving signals. If everything is configured properly, you should be able to see real-time data being transmitted from connected SDR devices.
Improve Reception: Click on "Tuner AGC" (Automatic Gain Control) to enhance the reception quality.
Check for Data: If the data is being correctly received, you will see a list of messages and identifiers of aircraft in the rtl1090 window.
Error Handling: If you encounter an error stating "Index :0; Cannot Read device info:-12. Cannot find device," it means that the correct driver for the dongle inserted in the USB port has not been loaded.
- Solution: Reinstall the correct driver using Zadig by selecting it from the Options > List all device menu.
Installation and Configuration of RTL1090 Version 3 (Scope)
Version 3, the latest and most advanced, introduced the "Scope" feature, which allows for graphical visualization of detected aircraft on the map. This tool displays a real-time radar, with aircraft represented on a grid, providing a more intuitive overview. It has been optimized for quicker and more accurate receptions for enthusiasts and advanced users. The interface has become more user-friendly, with advanced customization options.
This installation is easier if you start from an installed Version 2.
- Download: Visit the official rtl1090 website (https://rtl1090.com) and download the SCOPE version of the software.

rtl1090 RTL1090 Version 3 Scope rtl1090beta3.exe 13/4/2015
 |  |
This version is an upgrade, so it requires the installation of Version 2 first.

Configuration of RTL1090 Software
To ensure that your RTL1090 software functions correctly, it is essential to install some support files. Here are the steps to configure your system:
Step 1: Download or Copy the Necessary Files
If you no longer have the original folder, download the file from the following link:
https://osmocom.org/attachments/download/2242/RelWithDebInfo.zip
Alternatively, if you already have the rtl1090 folder, use the files from there.
Step 2: Unzip and Copy the Necessary Files
Download the RelWithDebInfo.zip file, then proceed to unzip it and copy the necessary files.
 |  |
Unzip the file ZIP in rtl-sdr-release
 Apri la directory x32

Copy the Files
Navigate to the extracted directory, specifically to rtl-sdr-release\x32. Locate the following files:
rtlsdr.dlllibusb-1.0.dll
Copy these files into the rtl1090 installation folder on your computer.
To work properly, a directory of rtl1090.beta3 must contain these files:

Start RTL1090 and check reception
Start the rtl1090.beta3.exe file: Go to the folder where you extracted and updated the RTL1090 software. Double-click the file to start the software.
rtl1090.beta3.exe supports error correction, so it should get more reports.

Press the Start button to begin decoding Mode-S or ADS-B signals. Note that you cannot receive both signals simultaneously; separate dongles are required.
Verify Reception: Once the software is launched, check that it is correctly receiving signals. If everything is set up properly, you should be able to see real-time data being transmitted from connected SDR devices.
Improve Reception: Open OPEN (top left of the screen) and Click on AGC Tuner to improve reception
Data Reception: If the data is being received correctly, you will see a list of messages and aircraft identifiers in the rtl1090 window.
Error Handling: If you encounter the error "Index :0; Cannot Read device info:-12. Cannot find device," it indicates that the correct driver for the dongle inserted in the USB port has not been loaded.
Solution: Reinstall the correct driver using Zadig by selecting it from the Options > List all device menu. This step will ensure that the correct driver is in place, allowing rtl1090 or any SDR software to effectively communicate with the dongle.

Click OPEN and copy all data as shown in this screen:

Now that rtl1090 is working we need to install the other programs and start with
Install rtl1090XHSI
Software rtl1090XHSI Download here:
http://it9ybg.altervista.org/RADIO/rtl1090XHSI.zip

Unzip the file into a folder (not in the Windows Program Files folders).
The folder contains rtl1090XHSI.exe and a folder named XHSI-2-Beta-7.

Run rtl1090 and press START, then click on rtl1090XHSI.exe, and allow Windows Defender to run the program.

This program has a box in the upper left corner where you can enter the ICAO number of an aircraft. You can copy this number from the black window of rtl1090 and paste it into the box. However, before doing this, you need to activate the file found by double-clicking on the XHSI-2-Beta-7 folder.

Open this folder, and two additional folders will appear.

Double-click on the XHSI2_app folder, and then double-click on the Windows folder.

The program is run by clicking on XHSI2.exe.


In this program, you also need to input a certain amount of data. Here are the screenshots to copy, although the data should have already been correctly loaded.

Be careful. In the following screen, on the first line, you need to write the entire path where the Windows sub-folder of the XHSI-2-0-Beta-7 folder is located. The path shown in the following screen is indicative.


If everything is OK, launching XHSI2.exe will load all the data, and the result, after entering the ICAO code in the designated box, is as follows:

Documentation:
Detailed installation and usage instructions are available in the README.txt file included in the download package. Additional information can be found on the XHSI Wiki on SourceForge.
Support and Community:
For assistance and discussions, visit the XHSI subforum on X-Plane.org.
Development and Contributions:
XHSI is an open-source project. Developers interested in contributing can access the source code and participate in development through the XHSI project page on SourceForge.
| Sign up to vote this object, vote his reviews and to contribute to Tiiips.EvaluateClose | (0 comments) |
Read other Tiiips about this object in __Italiano (1)
Download: Last update: 2024-12-01 15:10:15 | Licenza: |

